How to Customize the Default auth Pages of Your Refine Application
Hey there….
Hey there….
In this article, I’ll walk you through creating a Refine application step by step. After that, I’ll provide some insights into the application we’re building in just a few minutes. Lastly, I’ll help you implement authentication logic from scratch by customizing our authentication pages to fit our preferences.
To begin, let’s create a sample Refine application using their demo dataset. Start by creating a folder with your preferred name and open that directory in your chosen editor, such as VS Code. In this example, I’ll be using VS Code. Now, execute the following command in your terminal.
npm create refine-app@latest ./Then choose Vite for this question.

Next, select a name for your project. Opt for REST API as the data provider (Please note that you have the flexibility to choose different options based on your knowledge and preferences). Additionally, pick your preferred UI framework (Here I will use Ant Design as a UI library). If you wish, you can also explore their headless architecture. To grasp the concept of headless architecture, refer to the documentation

Subsequently, you’ll be prompted to create example pages; select “Yes.” Following that, you’ll encounter a prompt to install authentication logic. In this case, choose “None” as your response, as we intend to build it from scratch
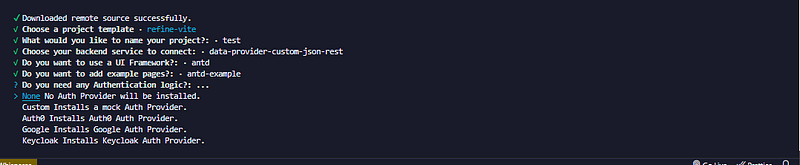
Next, choose between npm or yarn for dependency handling. In this instance, I’ll use npm. Optionally, you can enter your email in the following question. The application will then be created with example pages. If you opted to include authentication logic during the setup, Refine will generate it for you. How convenient is that?
This will result in a well-organized folder structure with sample pages, as shown below.
Now, navigate to the project directory using cd .\your_projectname and launch your project with npm run dev.
Let’s take a look at what the sample application looks like
This is where the magic happens. Take a moment to appreciate the beautiful and well-designed sample application that has been created for us. Even the option for dark mode is readily available. Consider the amount of time it might take to develop these features individually. That’s where Refine comes in handy. It offers a starting point with essential functionalities, allowing you to concentrate on the core aspects of your application without building everything from the ground up. Your task now is to customize these features according to your preferences. Take some time to explore the functionalities that are already available.
This video provides a quick demonstration of the application we’ve just created
Please note that you might have noticed a logout button in the dashboard. However, it won’t appear in your application until you implement authentication logic. (I recorded this video after completing all the implementations.)
Let’s go through the App.tsx
import { GitHubBanner, Refine } from "@refinedev/core";
import { DevtoolsPanel, DevtoolsProvider } from "@refinedev/devtools";
import { RefineKbar, RefineKbarProvider } from "@refinedev/kbar";

import {
  ErrorComponent,
  ThemedLayoutV2,
  ThemedSiderV2,
  useNotificationProvider,
} from "@refinedev/antd";
import "@refinedev/antd/dist/reset.css";

import routerBindings, {
  DocumentTitleHandler,
  NavigateToResource,
  UnsavedChangesNotifier,
} from "@refinedev/react-router-v6";
import dataProvider from "@refinedev/simple-rest";
import { App as AntdApp } from "antd";
import { BrowserRouter, Outlet, Route, Routes } from "react-router-dom";
import { Header } from "./components/header";
import { ColorModeContextProvider } from "./contexts/color-mode";
import {
  BlogPostCreate,
  BlogPostEdit,
  BlogPostList,
  BlogPostShow,
} from "./pages/blog-posts";
import {
  CategoryCreate,
  CategoryEdit,
  CategoryList,
  CategoryShow,
} from "./pages/categories";

function App() {
  return (
    <BrowserRouter>
      <GitHubBanner />
      <RefineKbarProvider>
        <ColorModeContextProvider>
          <AntdApp>
            <DevtoolsProvider>
              <Refine
                dataProvider={dataProvider("https://api.fake-rest.refine.dev")}
                notificationProvider={useNotificationProvider}
                routerProvider={routerBindings}
                resources={[
                  {
                    name: "blog_posts",
                    list: "/blog-posts",
                    create: "/blog-posts/create",
                    edit: "/blog-posts/edit/:id",
                    show: "/blog-posts/show/:id",
                    meta: {
                      canDelete: true,
                    },
                  },
                  {
                    name: "categories",
                    list: "/categories",
                    create: "/categories/create",
                    edit: "/categories/edit/:id",
                    show: "/categories/show/:id",
                    meta: {
                      canDelete: true,
                    },
                  },
                ]}
                options={{
                  syncWithLocation: true,
                  warnWhenUnsavedChanges: true,
                  useNewQueryKeys: true,
                  projectId: "Curvmv-BQOgep-yqQQ0u",
                }}
              >
                <Routes>
                  <Route
                    element={
                      <ThemedLayoutV2
                        Header={() => <Header sticky />}
                        Sider={(props) => <ThemedSiderV2 {...props} fixed />}
                      >
                        <Outlet />
                      </ThemedLayoutV2>
                    }
                  >
                    <Route
                      index
                      element={<NavigateToResource resource="blog_posts" />}
                    />
                    <Route path="/blog-posts">
                      <Route index element={<BlogPostList />} />
                      <Route path="create" element={<BlogPostCreate />} />
                      <Route path="edit/:id" element={<BlogPostEdit />} />
                      <Route path="show/:id" element={<BlogPostShow />} />
                    </Route>
                    <Route path="/categories">
                      <Route index element={<CategoryList />} />
                      <Route path="create" element={<CategoryCreate />} />
                      <Route path="edit/:id" element={<CategoryEdit />} />
                      <Route path="show/:id" element={<CategoryShow />} />
                    </Route>
                    <Route path="*" element={<ErrorComponent />} />
                  </Route>
                </Routes>

                <RefineKbar />
                <UnsavedChangesNotifier />
                <DocumentTitleHandler />
              </Refine>
              <DevtoolsPanel />
            </DevtoolsProvider>
          </AntdApp>
        </ColorModeContextProvider>
      </RefineKbarProvider>
    </BrowserRouter>
  );
}

export default App;
In this discussion, I won’t delve into dataProvider, notificationProvider, routerProvider, and resources. Instead, I’ll be writing separate, in-depth articles for each of these concepts (So, click the follow button). Our focus here is on implementing authProviders and customizing the authPages using swizzle
To provide a brief understanding of the process, the authProvider is utilized to manage our data throughout the application, where the mock data is sourced from https://api.fake-rest.refine.dev. Refine’s hooks make dealing with data in Refine much simpler compared to traditional methods. The notificationProvider oversees notifications across the Refine app. The routerProvider takes charge of routing navigation and synchronization between the user interface and the app’s state. As for resources, each one represents a logical entity with data that users can interact with.
Here is a shorter explanation of the given resources.
. Blog Posts:
- Name:
blog_posts - Data listing endpoint:
/blog-posts - Creation endpoint:
/blog-posts/create - Editing endpoint:
/blog-posts/edit/:id(where:idis the specific post's ID) - Details page endpoint:
/blog-posts/show/:id(similar to editing) - Deletable: Yes (as indicated by
canDelete: trueinmeta)
2. Categories:
- Name:
categories - Data listing endpoint:
/categories - Creation endpoint:
/categories/create - Editing endpoint:
/categories/edit/:id(similar to blog posts) - Details page endpoint:
/categories/show/:id(similar to blog posts) - Deletable: Yes (similar to blog posts)
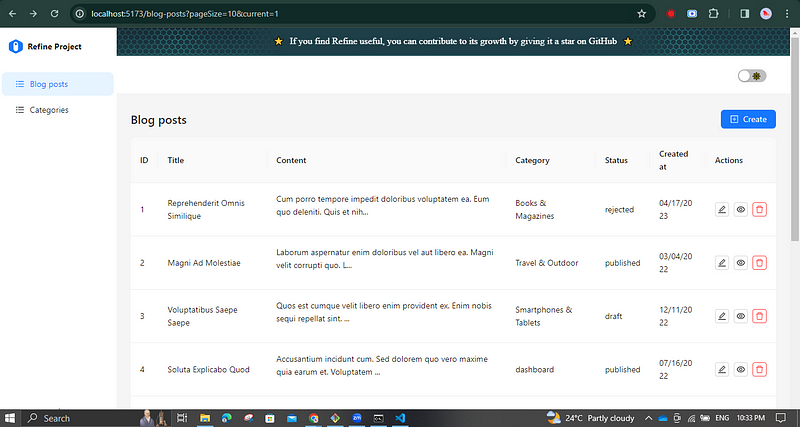
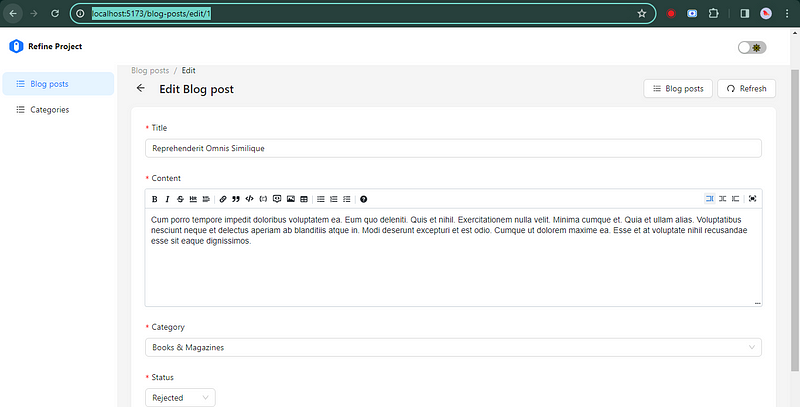
In simple terms, it outlines the resource name along with endpoints for listing, creating, editing, showing, and deleting data for a given resource. To view sample pages for each route, you can navigate to those endpoints. For instance, to access the editing page of a blog post, simply enter http://localhost:5173/blog-posts/edit/1 in your URL bar. (Your port number may vary)
Wow! What an impressive page they’ve designed for us! Take a look
Okay…. Now we are going to implement authentication logic for our application.
Auth Provider
To begin, let’s understand what an authProvider is. In simple terms, it is used to manage all authentications and authorizations in our application. Now, let’s refer to Refine’s official definition
Auth provider is an object that contains methods to handle authentication and access control in your app by having Refine consume them. These methods expect to return a promise, so they can be used with async methods. (From Refine Documentation)
When creating an authProvider, you have the flexibility to use any third-party authentication services (e.g., Auth0, Okta, etc.) or implement your own custom methods. It’s important to note that the authProvider is not mandatory for running your application. If you choose not to use it, the application will lack authentication capabilities, and you won’t be able to utilize any of the auth hooks or components.
Alright, now let’s enable the authProvider property in our application. To do this, start by importing authProvider into the App.tsx file and then pass an authProvider as a prop to the <Refine/> component.
Sample code (To demonstrate the changes)
import { Refine } from "@refinedev/core";

import authProvider from "./auth-provider";

const App = () => {
  return <Refine authProvider={authProvider} />;
};
Original code for our application (Here I added comments for all the changes).
import { GitHubBanner, Refine } from "@refinedev/core";
import { DevtoolsPanel, DevtoolsProvider } from "@refinedev/devtools";
import { RefineKbar, RefineKbarProvider } from "@refinedev/kbar";

import authProvider from "./auth-provider"; //****** import authProvider ******

import {
  ErrorComponent,
  ThemedLayoutV2,
  ThemedSiderV2,
  useNotificationProvider,
} from "@refinedev/antd";
import "@refinedev/antd/dist/reset.css";

import routerBindings, {
  DocumentTitleHandler,
  NavigateToResource,
  UnsavedChangesNotifier,
} from "@refinedev/react-router-v6";
import dataProvider from "@refinedev/simple-rest";
import { App as AntdApp } from "antd";
import { BrowserRouter, Outlet, Route, Routes } from "react-router-dom";
import { Header } from "./components/header";
import { ColorModeContextProvider } from "./contexts/color-mode";
import {
  BlogPostCreate,
  BlogPostEdit,
  BlogPostList,
  BlogPostShow,
} from "./pages/blog-posts";
import {
  CategoryCreate,
  CategoryEdit,
  CategoryList,
  CategoryShow,
} from "./pages/categories";

function App() {
  return (
    <BrowserRouter>
      <GitHubBanner /> // remove this component to avoid a banner about github
      <RefineKbarProvider>
        <ColorModeContextProvider>
          <AntdApp>
            <DevtoolsProvider>
              <Refine
                dataProvider={dataProvider("https://api.fake-rest.refine.dev")}
                authProvider={authProvider} //****** provide authProvider as prop ******
                notificationProvider={useNotificationProvider}
                routerProvider={routerBindings}
                resources={[
                  {
                    name: "blog_posts",
                    list: "/blog-posts",
                    create: "/blog-posts/create",
                    edit: "/blog-posts/edit/:id",
                    show: "/blog-posts/show/:id",
                    meta: {
                      canDelete: true,
                    },
                  },
                  {
                    name: "categories",
                    list: "/categories",
                    create: "/categories/create",
                    edit: "/categories/edit/:id",
                    show: "/categories/show/:id",
                    meta: {
                      canDelete: true,
                    },
                  },
                ]}
                options={{
                  syncWithLocation: true,
                  warnWhenUnsavedChanges: true,
                  useNewQueryKeys: true,
                  projectId: "Curvmv-BQOgep-yqQQ0u",
                }}
              >
                <Routes>
                  <Route
                    element={
                      <ThemedLayoutV2
                        Header={() => <Header sticky />}
                        Sider={(props) => <ThemedSiderV2 {...props} fixed />}
                      >
                        <Outlet />
                      </ThemedLayoutV2>
                    }
                  >
                    <Route
                      index
                      element={<NavigateToResource resource="blog_posts" />}
                    />
                    <Route path="/blog-posts">
                      <Route index element={<BlogPostList />} />
                      <Route path="create" element={<BlogPostCreate />} />
                      <Route path="edit/:id" element={<BlogPostEdit />} />
                      <Route path="show/:id" element={<BlogPostShow />} />
                    </Route>
                    <Route path="/categories">
                      <Route index element={<CategoryList />} />
                      <Route path="create" element={<CategoryCreate />} />
                      <Route path="edit/:id" element={<CategoryEdit />} />
                      <Route path="show/:id" element={<CategoryShow />} />
                    </Route>
                    <Route path="*" element={<ErrorComponent />} />
                  </Route>
                </Routes>

                <RefineKbar />
                <UnsavedChangesNotifier />
                <DocumentTitleHandler />
              </Refine>
              <DevtoolsPanel />
            </DevtoolsProvider>
          </AntdApp>
        </ColorModeContextProvider>
      </RefineKbarProvider>
    </BrowserRouter>
  );
}

export default App;
Great job! However, you might encounter an error in the line where you’re importing authProvider. This is likely because we haven’t created our auth-provider.ts file yet
Let's create it.
Now, go ahead and create a file named auth-provider.ts within the src folder
Inside this file, these are the methods we can have.
import type { AuthProvider } from "@refinedev/core";

const authProvider: AuthProvider = {
    // required methods
    login: async (params: any): AuthActionResponse,
    check: async (params: any): CheckResponse,
    logout: async (params: any): AuthActionResponse,
    onError: async (params: any): OnErrorResponse,
    // optional methods
    register: async (params: any): AuthActionResponse,
    forgotPassword: async (params: any): AuthActionResponse,
    updatePassword: async (params: any): AuthActionResponse,
    getPermissions: async (params: any): unknown,
    getIdentity: async (params: any): unknown,
};
Don’t worry. We need to implement those things according to our requirements. Here, I will focus on login, check, logout, and onError methods (required methods) only. Follow the documentation for other methods.
Here you can see the updated code with comments. So you can easily understand what happens there.
import type { AuthProvider } from "@refinedev/core";

// sample data for testing purpose
const mockUsers = [
  { email: "john@mail.com", pwd: "123", role: "admin" },
  { email: "jane@mail.com", pwd: "123", role: "reader" },
];

const authProvider: AuthProvider = {
  // required methods
  login: async ({ email, password }) => {
    /**
     * Here we actually send a request to the back end here.
     * But here we use find method since we are stored mockusers inside an array*/
    const user = mockUsers.find(
      (item) => item.email === email && item.pwd === password
    );

    // store the user data in local storage
    if (user) {
      localStorage.setItem("auth", JSON.stringify(user));
      /**
       * If process has completed we need to set success as true
       * Also you need to provide an url to be redirected after successful login
       * Here we use '/blog-posts'
       */
      return {
        success: true,
        redirectTo: "/blog-posts",
      };
    }
    /**
     * For the wrong credentials we set success as false
     * Then we have a logging error with name
     */

    return {
      success: false,
      error: {
        message: "Login Error",
        name: "Invalid email or password",
      },
    };
  },

  /**
   * The check method is used to check if the user is authenticated
   */
  check: async () => {
    const user = localStorage.getItem("auth");

    if (user) {
      return {
        authenticated: true,
      };
    }

    /**
     * authenticated: A boolean value indicating whether the user is authenticated or not.
     * redirectTo: A string value indicating the URL to redirect to if authentication is required.
     * logout: A boolean value indicating whether the user should be logged out.
     * error: An Error object representing any errors that may have occurred during the check
     */
    return {
      authenticated: false,
      logout: true,
      redirectTo: "/login",
      error: {
        message: "Check failed",
        name: "Unauthorized",
      },
    };
  },
  logout: async () => {
    // remove the uer from local storage
    localStorage.removeItem("auth");
    /**
     * After logout, success variable need t set as true
     * In here, we redirect user to the login page after logging out
     */
    return {
      success: true,
      redirectTo: "/login",
    };
  },
  //  onError method is called when you get an error response from the API.
  //  You can customize with your requirements
  onError: async (error) => {
    if (error.status === 401 || error.status === 403) {
      return {
        logout: true,
        redirectTo: "/login",
        error,
      };
    }

    return {};
  },

  // optional methods

  // register: async (params: any): AuthActionResponse,
  // forgotPassword: async (params: any): AuthActionResponse,
  // updatePassword: async (params: any): AuthActionResponse,
  // getPermissions: async (params: any): unknown,
  // getIdentity: async (params: any): unknown,
};

export default authProvider;
Alright, it’s time to proceed with the authentication of our application. For that, you need to use <Authpage/> (comes from @refinedev/antd) and <Authenticated/> (comes from @refinedev/core . So update these two lines in your App.tsx as below.
import {
  Authenticated,
  GitHubBanner,
  Refine
} from "@refinedev/core";

import {
  AuthPage, // import authPage
  ErrorComponent,
  ThemedLayoutV2,
  ThemedSiderV2,
  useNotificationProvider,
} from "@refinedev/antd";
Next, let’s secure our components. Make the necessary updates to the code in your App.tsx file as outlined below. (I’ve included comments to explain each change.)
Here is the updated code
import { Authenticated, GitHubBanner, Refine } from "@refinedev/core";
import { DevtoolsPanel, DevtoolsProvider } from "@refinedev/devtools";
import { RefineKbar, RefineKbarProvider } from "@refinedev/kbar";

import authProvider from "./auth-provider"; // import authProvider

import {
  AuthPage,
  ErrorComponent,
  ThemedLayoutV2,
  ThemedSiderV2,
  useNotificationProvider,
} from "@refinedev/antd";
import "@refinedev/antd/dist/reset.css";

import routerBindings, {
  CatchAllNavigate,
  DocumentTitleHandler,
  NavigateToResource,
  UnsavedChangesNotifier,
} from "@refinedev/react-router-v6";
import dataProvider from "@refinedev/simple-rest";
import { App as AntdApp } from "antd";
import { BrowserRouter, Outlet, Route, Routes } from "react-router-dom";
import { Header } from "./components/header";
import { ColorModeContextProvider } from "./contexts/color-mode";
import {
  BlogPostCreate,
  BlogPostEdit,
  BlogPostList,
  BlogPostShow,
} from "./pages/blog-posts";
import {
  CategoryCreate,
  CategoryEdit,
  CategoryList,
  CategoryShow,
} from "./pages/categories";

function App() {
  return (
    <BrowserRouter>
      <RefineKbarProvider>
        <ColorModeContextProvider>
          <AntdApp>
            <DevtoolsProvider>
              <Refine
                dataProvider={dataProvider("https://api.fake-rest.refine.dev")}
                authProvider={authProvider} // provide authProvider as prop
                notificationProvider={useNotificationProvider}
                routerProvider={routerBindings}
                resources={[
                  {
                    name: "blog_posts",
                    list: "/blog-posts",
                    create: "/blog-posts/create",
                    edit: "/blog-posts/edit/:id",
                    show: "/blog-posts/show/:id",
                    meta: {
                      canDelete: true,
                    },
                  },
                  {
                    name: "categories",
                    list: "/categories",
                    create: "/categories/create",
                    edit: "/categories/edit/:id",
                    show: "/categories/show/:id",
                    meta: {
                      canDelete: true,
                    },
                  },
                ]}
                options={{
                  syncWithLocation: true,
                  warnWhenUnsavedChanges: true,
                  useNewQueryKeys: true,
                  projectId: "Curvmv-BQOgep-yqQQ0u",
                }}
              >
                <Routes>
                  <Route
                    element={
                      <ThemedLayoutV2
                        Header={() => <Header sticky />}
                        Sider={(props) => <ThemedSiderV2 {...props} fixed />}
                      >
                        <Outlet />
                      </ThemedLayoutV2>
                    }
                  >
                    <Route
                      index
                      element={<NavigateToResource resource="blog_posts" />}
                    />
                    <Route
                      path="/blog-posts"
                      element={
                        // add authenticated component
                        <Authenticated
                          key="blog-posts"
                          //fallback =>  Content to show if user is not logged in
                          fallback={<CatchAllNavigate to="/login" />}
                        >
                          <Outlet />
                        </Authenticated>
                      }
                    >
                      <Route index element={<BlogPostList />} />
                      <Route path="create" element={<BlogPostCreate />} />
                      <Route path="edit/:id" element={<BlogPostEdit />} />
                      <Route path="show/:id" element={<BlogPostShow />} />
                    </Route>
                    <Route path="/categories">
                      <Route index element={<CategoryList />} />
                      <Route path="create" element={<CategoryCreate />} />
                      <Route path="edit/:id" element={<CategoryEdit />} />
                      <Route path="show/:id" element={<CategoryShow />} />
                    </Route>

                    <Route path="*" element={<ErrorComponent />} />
                  </Route>
                  <Route
                    //  add authenticated component
                    element={<Authenticated key="auth" fallback={<Outlet />} />}
                  >
                    <Route
                      path="/login"
                      // add authpage wich is for login
                      element={<AuthPage />}
                    />
                    <Route
                      path="/register"
                      // add authpage with type="register"
                      element={<AuthPage type="register" />}
                    />
                    <Route
                      path="/forgot-password"
                      // add authpage with type="forgotPassword"
                      element={<AuthPage type="forgotPassword" />}
                    />
                  </Route>
                </Routes>

                <RefineKbar />
                <UnsavedChangesNotifier />
                <DocumentTitleHandler />
              </Refine>
              <DevtoolsPanel />
            </DevtoolsProvider>
          </AntdApp>
        </ColorModeContextProvider>
      </RefineKbarProvider>
    </BrowserRouter>
  );
}

export default App;
In Refine, the <Authenticated> component serves as a gatekeeper, controlling access to specific parts of your application based on the user's authentication status. It essentially performs two main functions:
1. Conditional Rendering:
- Depending on the user’s login status, it decides what to display:
Authenticated User:
Renders the content passed as its child components, allowing access to the protected section.
Unauthenticated User:
Offers different options as below
- Fallback Content: If a
fallbackprop is provided, it displays alternative content, like an info message or a "Login" button. - Redirect: By default, it redirects the user to a specific route, typically the login page (
/login).
2. Authentication Status Check:
- The component internally utilizes the
useIsAuthenticatedhook to retrieve the user's authentication information. This hook returns an object with details like: isSuccess: Indicates successful authentication (true if logged in).isLoading: True while checking the authentication status.isError: True if an error occurred during authentication.
Here the <AuthPage/> component from @refinedev/antd offers a pre-built and customizable UI for various authentication features in your Refine app, leveraging Ant Design components for visual consistency. It handles different auth types:
Supported Features:
- Login: Users can enter credentials to log into your app.
- Register: Create new accounts with required information.
- Forgot Password: Reset forgotten passwords via email or other recovery methods.
- Update Password: Change existing passwords for enhanced security.
If you want to use prebuilt Register, Forgot Password, and Update Password components for the application as we used here, you need to pass the type attribute. By default <AuthPage/> provide Login page.
Refer to this code section
                  <Route
                    //  add authenticated component
                    element={<Authenticated key="auth" fallback={<Outlet />} />}
                  >
                    <Route
                      path="/login"
                      // add authpage wich is for login
                      element={<AuthPage />}
                    />
                    <Route
                      path="/register"
                      // add authpage with type="register"
                      element={<AuthPage type="register" />}
                    />
                    <Route
                      path="/forgot-password"
                      // add authpage with type="forgotPassword"
                      element={<AuthPage type="forgotPassword" />}
                    />
                  </Route>
This demonstrates how to utilize pre-built authentication pages for our application.
Alright, we’re done. Stop the application and restart it. You’ll be automatically redirected to the login page because you are currently not authorized to access the contents of the blog posts

How beautiful is that?… You can check around other links to Sign up, Forgot Password, and Update Password as well. If you carefully look at the App.tsx, We did not authenticate the categories resource. So you can access those endpoints without logging into the system. I will leave it for you to handle as we did.
Okay Let’s Log in to the application using our mock data ( Look at the auth-provider.ts)
// sample data for testing purpose
const mockUsers = [
  { email: "john@mail.com", pwd: "123", role: "admin" },
  { email: "jane@mail.com", pwd: "123", role: "reader" },
];
Just use, one credential and try to log in…
Below you can see a small video clip to demonstrate those auth pages.
Alright, you may recall that we haven’t actually created any of these authentication pages. So, how can we customize them without having the corresponding components in place?
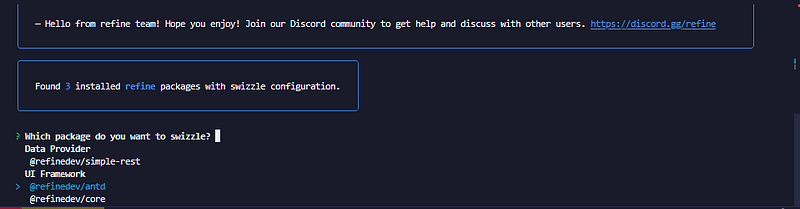
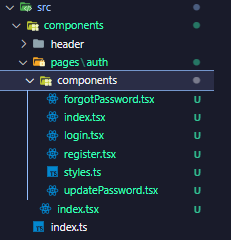
This is where swizzle comes into play. Now, let’s generate those authentication pages within our folders.
First, You need to use refine-cli (automatically installed in our project since we used create refine-app command to create the app) to swizzle the auth pages and customize them. Then Open up a new terminal and navigate to the project we have created. Then run the following command
npm run refine swizzleHere you need to choose @refinedev/antd since we use ant design as our UI library.
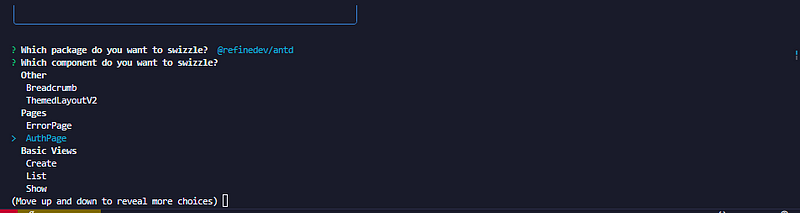
In the next section go down using the arrow key until you select the AuthPage under the Pages section. Then press enter.
Alright, we’ve completed the page generation process. You’ll receive a message similar to this one, confirming the creation of files along with their directories. Feel free to verify them
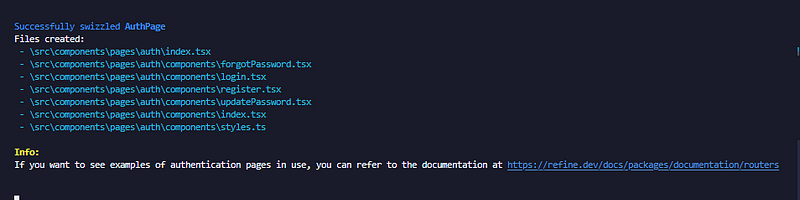
Navigate to those directories, and you’ll find all the files available for customization. Now that we have access to these auth pages, simply open the desired files and customize them according to your preferences.
However, we’re not quite done yet; there’s just a small task left to complete.
We do not need to import AuthPage from @refinedev/antd . So find this code segment and remove AuthPage
import {
  AuthPage, // remove this line
  ErrorComponent,
  ThemedLayoutV2,
  ThemedSiderV2,
  useNotificationProvider,
} from "@refinedev/antd";
Just remove AuthPage and import it in a new line as below.
import { AuthPage } from "./components/pages/auth";
// you need to carefully select the path of AuthPage
Here you can find your AuthPage .

Now, open the App.tsx file, and with that, we’ve completed the process. Feel free to explore and customize the auth pages as you like.
In this blog post, we walked through the process of creating a Refine application, utilizing a demo dataset and exploring its various functionalities. We focused on implementing authentication logic from scratch, using authProvider and customizing authPages with swizzle. The blog covers the steps to activate the authProvider property, protect components, and use pre-built authentication pages. Additionally, we discussed the role of swizzle in creating and customizing auth pages. Overall, it provides a comprehensive guide to setting up and customizing a Refine application with authentication features.
Happy Coding